Wednesday, December 16, 2009

Sahana's 8 month Rudolf cupcake


Sahana is 8 months old today--oh how time flies! She is crawling now and can stand on her own by holding onto support. She is a super sweet firecracker! Well let me not start on about her or i'll never stop. I have made a cake for her for every month. Today, after work I was really tired and didn't have the energy or the time to do anything ellaborate (Sahana was crawling up my leg as I was making this). Plus I really didn't want to eat cake or for that matter anything that would hinder my efforts at losing these last few baby pounds. So i ended up
using a box yellow cake mix and since I didn't want to make or eat a dozen cupcakes, I took only 1/3 of the mix and adjusted all other pacakge ingredients accordingly. I added in some mashed bananas and chopped walnuts and baked them in my super awesome silcone cupcake tray for 20 minutes. I was planning on making the number 8, but slowly i just got caught up in the festive spirit and ended up making rudolf! After cooling the cupcakes I spread some nutella on top of the cupcakes, joined two of them together and then added the cherry nose and M&M eyes and buttons. I needed pretzels for the antlers but since i didn't have any, I stuck in some egg noodles. Isn't this cute? Happy holidays everyone. I head out to my sister's place on Christmas and will see you back here in the new year.

Wednesday, December 2, 2009

Chicken Mole


Every girl needs that one great friend who she can talk to anytime about anything and everything- one person to share the good and the bad with. That friend for me is Sonia. We went to grad school together and were house mates. Oh! What a ball we had in those days. Over time we saw each other get married, get our PhDs, have kids etc and we have remained great friends. Since i've moved to Seattle I miss Sonia the most. We often talk on the phone and through emails and it feels like i still live next door. Can't wait to meet her next year and especially have her meet my daughter for the first time. Well, she is a GREAT cook. Parties (and there were many) at her place entail lots and lots of great food. Today she sent me a recipe. She said she mixed a number of diffrent recipes to make her own chciken mole. The fact that she sent me this recipe means, it has to be really good. She is scared that if my readers don't like it she will be blamed for it. Knowing Sonia, if this recipe doesn't taste good to you, chances are you messed up!  Simply put Mole sauce as i knew it was a mexican sauce with chocolate in it but wikipedia enlightened me a little bit more here. I still haven't made this but definitely plan to this weekend. I'll add my pics soon in here as well. I just wanted to post this right away. Thanks a ton my sweet Sonia. I had hit a dry spell here on my blog, you got me rolling again. Enjoy everybody!


Prep time: 20 minutes
Cooking time: 50 minutes

Ingredients:
2 boneless chicken breasts
one small onion-chopped fine
one bunch green onions-chopped
11/2 diced tomatoes
1cup tomato puree
2 cloves chopped garlic
1 tblsp peanut butter
1tsp cumin powder
½ tsp cinnamon powder
½ tsp nutmeg powder
½ tsp pepper powder
2tsp red chilli powder or paprika
3-4 cloves
4-5 sliced green chillies
1 ½ squares of semi-sweet baker`s chocolate - crushed
4tblsp oil
½ cup chicken broth
1tsp lemon juice
salt to taste
chopped cilantro for garnish

Method:
1. Clean and cut chicken breasts into small pieces.  Sprinkle with salt and pepper
2. Heat 2 tblsp oil in a pan. Braise chicken pieces on high heat till just done.  Keep aside.
3. In the same pan, heat the rest of the oil.  Add chopped onion and green onion.  Fry for sometime.  Add chopped garlic and fry for a minute.
4. Add chopped tomato and all the dry spices and cook till tomatoes have dissolved.  Add peanut butter and chicken broth to obtain a gravy consistency.
5. Now add the crushed chocolate pieces and blend in well. Stir gently but continuously to prevent chocolate from sticking to the pan.
6. Add tomato puree and salt. Let mole cook for 5 minutes (with continuous stirring). Check taste and sprinkle lemon juice if necessary.
7. Add chicken pieces, mix well and transfer all the contents to a baking dish.
8. Cover and bake for 40 minutes at 350°F.
9. Garnish with chopped cilantro.  Serve spooned atop white rice.

Monday, November 9, 2009

Stuffed Cauliflower


O.K I know my picture sucks! But trust me this is a really nice recipe. I got it from my Tarla Dalal cookbook. Its so easy and really tastes good. This has been sitting in my inbox for days. When I first saw the recipe I wasn't sure about it. But I was so bored of the usual fare that i went ahead and made it. Its a nice side dish and i'm sure next time I make it i can make it look much better than this. The picture in the book was really pretty. You essentially cook a whole caulifower, stuff it with a corriander coconut chutney, bake it and pour a slightly sweet tomato sauce over it before serving. Next time I might use some cheese too.

Ingredients
One whole head of a culiflower

Marinade:
One bunch of cilantro
2 green chillies
4 tblsp grated coconut (fresh or frozen)
1/2 tsp sugar
1 tsp lemon juice
salt to taste

For Sauce
1 tblsp all purpose flour
1 tbslp butter
1 cup tomato ketchup
1/4 tsp chilly powder
salt and sugar to taste

Method:
Grind all the marinade ingredients together in a blender to a smooth paste.
Boil salted water. Remove leaves of whole cauliflower and add the whole cauliflower to boiling water. Cook till almost done but not too mushy that it will break on touch. Let it cool. Apply the corriander marinade all over and in between florets. Place it in the oven on warm for atleast 20 minutes. Prepare a roux-melt butter and add flour. Cook till bubbly and brown. Add the tomato ketchup and seasonings. Just before serving pour the sauce over the cauliflower, garnish with cooked peas or put some grated cheese on top and bake till melted. Makes a great side dish.

Thursday, November 5, 2009

No Bake Pumpkin Pie


It was a very action packed weekend. Nits was out of town, Sahana's first halloween so I wanted it to be fun. On Friday Sahana "the dragon" had a parade at her day care. It was really cute to see all the kids walk around in their adorable costumes. Sahana was a doll in her giant red and blue dragon outfit with wings and tail-super cute. Here's a pic of her trying to escape. At home I set about carving my jacko lanterns. I wanted to make something appropriate for this time of year. Then i remembered my Everyday Living- November edition had a no bake pumpkin pie recipe that was eggless as well. My inlaws don't eat eggs although gelatin is o.k so this recipe was perfect. Another one of Martha's recipes here. This was a relatively easy dessert, especially with the store bought graham cracker crust I used.

Ingredients (makes 2 pies)
One can Libby's pumpkin pie mix/or any brand pumpkin puree
4 oz cream cheese at room temperature
One can evaporated milk
One cup brown sugar
1 tsp pumpkin pie spice mix
2 packets gelatin
1/4 cup cold water
2 store bought graham cracker pie crusts
whipped cream (to serve with)

Method
Whisk cream cheese into the pumpkin pie mix till well blended. Add gelatin to cold water and let it sit for 5 minuts. Meanwhile heat milk and brown sugar in a saucepan to a low boil, lower heat and simmer.  Add spice mix and gelatin and stir on low heat until all the gelatin dissolves. Add the milk to the pumpkin mix and whisk well until all the ingredients are well blended. Pour into pie crusts. Refrigerate for atleast 3 hours till set. Serve with whipped cream.

Wednesday, October 28, 2009

Homemade Plain Yogurt/ Dahi (using grocery store yogurt culture)


This recipe people is priceless. My MIL/Aai developed this after much trial and error and it works flawlessly every time. Plain yogurt or dahi is an integral part of the Indian diet. Many Indians complain about the store bought yogurt since it is full of pectin and tastes different from our lovely homemade dahi that all our Indian moms make. Also many think they have to get the culture from India to make it just like home. As you will see just use your regular store bought yogurt as culture and it works just fine. Quite frankly I didn't think eating store boiught yogurt was bad or mattered so much until i started eating this yogurt and now its hard for me to go back to my old ways. Just invest in one thing-the yogurt maker. Due to the temperature presure conditions in the united states, making dahi at home reuires a yogurt maker. Yogurt makers can cost from 20 to 50 dollars. I bought mine for 25 bucks online and i LOVE it. So if you haven't tried it yet, try this one for sure.

Ingredients

1/2 Liter whole milk
1.5 tblsp non fat dry milk (skim milk powder)
1/8th tsp store bought yogurt (yes very little, amount equivalent of 1/4 of your first digit on your finger) For me Dannon or Mountain High worked well, not so well with Organic ones for some reason.

Method

Dissolve milk powder in whole milk. Microwave on high for one minute. Stir. Milk should be lukewarm. Add yogurt culture and stir well. Place in yogurt maker for approximately 6-7 hours. This time can change depending on how much culture you use. Too much culture will result in faster setting but the yogurt can turn sour.The time of incubation can be adjusted for overnight setting by adding even lesser culture. Yogurt is ready when it is thick but not completely set and gelled. Place it in the refrigerator for atleast 2 hours and it will set to perfection. Serve chilled.


Sunday, October 11, 2009

Almond Pistachio Rolls (Badam Pista Rolls)


Happy Diwali Folks! This is going to be Sahana's first Diwali so we are celebrating in full swing. Our lights are up this weekend and all the "faral/khaan" is getting ready. The idea for this roll came while my sister was once making fondant using marzipan. Marzipan is nothing but a sweetened almond paste. You can use it easily to make traditional indian almond sweets. I rolled out marzipan and stuffed it with pistachio and the results were just like from an indian sweet store. Please do try this one.

Ingredients (makes about 12)
One package marzipan
One cup pistachios (soak in warm water for 2 hours)
1/2 tbslp corn syrup
3/4 cup sugar
1/2 cup milk
2 tbslp ground cardamom
a few drops green food color
ghee/butter-1 tbslp and some more to grease
a few sprigs of mild saffron

Method
Grind pistcahios to a smooth paste using a little bit of the milk. Heat sugar, cornsyrup and milk to boiling. Lower heat to medium low and add pistachio paste. Mix continuously and cook. The mixture will thicken and stick together into a mass that is soft (about 10-15 minutes). Before removing from heat add 1 tblsp ghee . Mix well.Grease two sheets of wax paper. Place pistachio paste on one wax paper and let it cool for about half an hour. Meanwhile roll out marzipan into 4x3 recatngles (or roll out one long rectangle) on greased wax paper. Make small cylinders using the pistchio paste. Place along the width of the marzipan rectangle.Roll marzipan over to form a roll. If you use one large rectangle, fill with a large cylindrical tube of the pistachip paste, roll to forma tube and the cut the big roll into many smaller rolls. Lightly press the front to flattent the pistachio filling in each roll. Place a sprig of saffron on top to decorate and eat away!


Monday, September 28, 2009

Macaroni Casserole


Oh I'm easyyyyyyy, easy like sunday morning! There's a new tradition at home now. The guys get to cook Sunday lunch. Yaaay for the girls. Its funny how Nits is looking over at the TV from the kitchen all the time craving for his Sunday football. This is how it works. I pick out the recipe and they make it. This week I picked Tarla Dalal's macaroni hotpot recipe. So easy and very very fingerlicking yummy. They did a very good job. Now if only everyday was a sunday.

Ingredients (Serves 4)

1 1/2 cups elbow macaroni, boil in salted water , drain and keep aside
Two onions, sliced in rings
One large green pepper/capsicum, sliced in rings
One can baked beans
4 tomatoes, boil in water for about 5 minutes, skin and chop them (or use canned diced tomatoes)
1/4 cup tomato ketchup
4 cloves chopped garlic
1-2 tbsp butter
1/2 cup grated cheddar cheese
salt to taste

Method
Melt butter in a deep pot. Add onion rings and saute till transparent. Add green pepper rings and saute a bit more. Remove a few onion and pepper rings for garnish. Add garlic and tomatoes and cook for about 5 minutes. Add macaroni, ketchup, beans and salt. Mix well and cook till heated through. Grease a casserole with butter. Add the mixture into it. Cover with onion and pepper rings. Sprinkle grated cheese on top. Bale covered for 20 minutes at 400 F. Serve hot with a side salad.

Monday, September 21, 2009

Vanilla -Raspberry Panna Cotta


I'm going to keep this short. Have to rush and finish my experiment before going to pick up Sahana from day care. If you're looking for a quick no-egg dessert....this is it. This is from my Betty Crocker cookbook. Super fast and easy. Replace the vanilla essence for any other essence for a different flavor and replace the raspberries for peaches or strawberries. A very versatile dessert.


Ingredients (serves 4)

Panna Cotta

2 cups half and half
1 1/2 tsp gelatin
1 tsp vanilla essence
1/4 cup sugar
dash of salt

Raspberry sauce

1/2 carton fresh raspberries (save remaining)
1/4 cup sugar
1/4 cup water
1 tsp cornstarch

Method

Sprinkle gelatin over half and half in a saucepan and let it sit for about 10-15 minutes to soften. Place half and half over medium high heat and stir constantly till gelatin dissolves completely. Do not let the cream boil. Remove from heat and stir in sugar, essence and salt. I had to put the cream mixture back on for a few minutes and stir to get all the gelatin dissolved. Cool the mixture and pour into ramekins/bowls and refrigerate for at least 4 hours.

For the sauce mix cornstarch in water and sugar. Bring to a boil. Add the fresh raspberries and keep stirring as the mixture boils and thickens. Once the raspberries are completely dissolved and the mixture has thickened to a sauce like consistency remove from heat and run the mixture through a sieve to remove the seeds (you can skip the sieving if you like the seeds in). Pour into a jar. This sauce can be refrigerated for upto a month.

Once the custard is set, pour sauce over the custard. Garnish with fresh raspberries and serve.

Monday, September 14, 2009

Meatless Enchiladas


This weekend was awesome. We drove down to Port Townsend and spent the day at the beach. Sahana loved the sand and had a whale of a time.


On Sunday decided to give my in-laws a taste of something new. They aren't really much into non-Indian cuisine and they're vegetarian so I thought of making something mexican for them to try. Here is my recipe for semi homemade enchiladas.

Ingredients (serves 4)

8 medium sized corn Tortillas
Oil
1 cup diced green, red and yellow peppers mix (or any pepper)
1 large onion diced
2 pods garlic, chopped
1 small can of refried beans (if you don't get this where you live, soak kidney beans for a couple of hours, slow cook with salt, cumin and red pepper till cooked to a mush. You can also completely omit this or replace with cooked black beans)
1 can enchilada sauce or to make your own try this recipe
Mexican cheese grated or any kind of melty cheese you get where you live

Method
Heat oil not to a frying temp but hot. Place tortillas in hot oil for a few seconds and remove. Place on a hot plate. Fry garlic onions and peppers in remaining oil till soft and tender. Take one tortilla and place onion pepper mix along the center. Add beans and cheese over it. Fold tortilla and place fold side down in a rectangular baking dish. Do the same with the remaining tortillas, lining up all the tortillas along the dish. Pour enchilada sauce over the tortillas till they are completely immersed in it. Sprinkle cheese on top and bake at 350 for 10 minutes till cheese completely melts.

Saturday, August 29, 2009

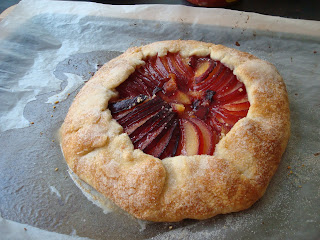
I'm back with an awesome Plum Tart


Hey people! I'm back from my big baby hiatus (or so i think). I went to watch the movie Julie and Julia and was inspired to get back on the blogging bandwagon. After the haze of the first 3 months, things have settled down into a smooth rhythm with good sleep schedules and lots of fun interactive times. I've gotten used to managing work and home (although I have my in laws helping me out now). Come October, Sahana starts child care with which life might hit some hiccups and after a few days I think the three of us shall sail smoothly on our own. So with my MIL taking charge of the kitchen little is left for me to do in there. I have still managed to sneak in a few recipes now and then. Here is one that came out really well. I came home to find Martha Stewart's everyday food magazine in the mail and it had a whole plum section in it. For the first time ever there in front of me were 6 giant plums sitting on the counter. Yaaaay! So began my first attempt at making a tart and as you will see it went pretty well.


It was my first attempt at making any kind of pastry from scratch and my first tart ever. So here is Martha stewart's recipe for a plum tart tweaked slightly by me.

Pastry:
2 1/2 cups all purpose flour (extra to roll pastry)
2 sticks COLD unsalted butter, cut into tiny chunks
8 tablespoons sugar plus one tsp more (maybe more if your plums are a bit tart like mine were)
1 tsp salt
1/4 cup iced water
1/4 cup toasted almonds
6 plums (any kind: i mixed red and black plums)
Milk or cream to brush the pastry

Method:
Combine flour, butter, salt and 1 tsp sugar in a food processor and pulse the dough. Slowly add iced water till dough is crumbly but holds when squeezed. Martha says not to over mix. Shape the dough into a ball, flatten the top, wrap in saran wrap. Refrigerate for one hour.
Grind almonds, 3 tblsp sugar and 2 tblsp flour and grind into a fine meal.
Halve the plums, pit them and slice into thin slices keeping the sliced plum together.
Roll out dough into a 1/4 inch thick circle. Transfer to a cookie sheet lined with wax paper. Transfer dough to the sheet. Sprinkle almond mixture onto the dough. Transfer sliced plums to the pastry and fan out the plums leaving a slight border. I arranged the plums if my fanning didn't work too well and also just placed pieces of plums in the center to not waste those not so perfect pieces. Fold the edges of the dough over the plums. Refrigerate for 15-20 minutes. Brush the crust with milk/cream. Sprinkle 4-5 tblsp sugar onto the tart (i sprinkled more since my plums were tart). Bake at 350 degrees till the crust is golden brown and cooked which was about an hour in my oven. Serve on its own or with vanilla ice cream.

Sunday, May 24, 2009

Akbar Ali Sandwich


This is one of my favorite brunch recipes. I learnt how to make these sandwiches from my mom. The sandwich is a variation of a type thats sold in the Akbar Ali area of Mumbai and thus the name. My mom made this for us when she came to stay with us when Sahana was born. Its a layered vegetarian sandwich but you can definitely modify and add whatever you want to it.

Ingredients

Bread: white or wheat

Fillings
1/2 cucumber fineyl chopped
1 tomato finely chopped
grated cheddar cheese
One onion sliced
Two large potatoes, sliced thinly
Butter or butter spread
Oil

Method
Add oil to a pan. Saute sliced onions till golden. Add sliced potatoes. Season with salt and pepper and cook till potatoes are done.

Chutney
1 cup cilantro
1/4 cup coconut
1 pod garlic
1 tsp sugar
salt to taste
lime juice
Grind all these ingredients to a fine paste using water.


Assembling the sandwich.
Toast the bread. Take one slice of bread. Apply butter. Add generous amount of the chutney. For layer one add chopped cucumber and tomatoes and a little bit of cheese.

Take another buttered toast place on top of the first layer and add onion potato filling and a little bit of cheese. At this layer you can add tomato ketchup if you like. Top with another buttered toast.

Place the club sandwich on a hot pan greased with oil spray. Press down the sandwich using a spatula. Do this on both sides.

Remove from heat. Cut in half and serve with more chutney and ketchup.
I couldn't resist it: look i even took a bite out of it before I was done taking pics.

Saturday, May 2, 2009

Mango and Vanilla Ice cream


Between the 2-3 hour feeding cycles, I managed to find some time to surf the web for random baby items and kitchen appliances. I found this ice cream maker up for grabs on craigslist. I have been wanting one for ages and finally got a brand new one at half the price. Since moving to Seattle I have started to appreciate the importance of recycling, reuse and thrift store shopping to reduce waste in the world. Remember: one person's trash is another person's treasure!! With this began my attempts at making ice-cream. I wanted all the recipes to be vegetarian since raw eggs are not something lactating moms want to use. Here are my recipes for mango and vanilla ice cream.


Mango Ice cream

Ingredients (All ingredients should be cold)

2 cup heavy cream
1 cup whole milk
1 cup chopped mangoes
3/4 cup mango puree/pulp
3 tbslp sugar

Method
This method is for my ice cream maker. Just follow instructions for your ice cream maker. Put ice cream maker insert in the freezer wrapped in saran wrap for atleast 24 hours. I tend to store mine in the freezer that way its always ready when I need it. If you don't have one, freeze the ice cream in the freezer and blend in the blender 2-3 times between freezes.
Combine all ingredients together. Chill in the freezer for 30 minutes to chill through but not freeze. Add into ice cream maker and churn according to manufacturer instructions. In my ice cream maker I churn for about 20 minutes. Move into an air tight container and store in the freezer for an hour if you want the ice cream harder.

Vanilla Ice cream

Ingredients (All ingredients should be cold)


2 cup heavy cream
1 cup whole milk
1 vanilla bean (i buy mine online from Penzeys spices)
3/4 cup sugar

Method

Slit vanilla bean length wise and using a thin knife scrape out the " vanilla meat" in the bean. Add the vanilla into the milk along with the left over bean. Warm the milk In a medium saucepan over low heat with vanilla. Remove from heat and remove bean. Cool milk in the fridge. Add cold cream and sugar. Combine and chill in the freezer to chill through but not freeze. Add into ice cream maker and churn according to manufacturer instructions. I churn for about 20 minutes. Move into an air tight container and store in the freezer for an hour if you want the ice cream harder.

Friday, April 24, 2009

Sahana is here!!


I'm a mommyyyyyy!!!!!!!!!!!!! My baby girl came into this world on April 16th. If i may say so myself she is absolutely adorable. She's keeping me busy round the clock and I feel like a dairy animal ; ) but she is sooooo worth it.
Lots of recipes are piling up and I will slowly ease into posting them. Till then wish me luck with surviving all the sleep deprivation. Oh yes i also bought an ice cream maker so if any of you have some good ice cream recipes please send me a link to look them up.
More later.

Sunday, April 12, 2009

Yummylicious Bread Pudding


Last night I had this strong craving for bread pudding. Since we only eat wheat bread and I had never made bread pudding with wheat bread I thought twice before making this. Believe me it turned out just awesome. Plus it was super easy and fast to make ....remember a craving pregnant woman can't wait too long. The pudding had a rich caramelly bottom layer and the pudding itself was moist and smelt of cinnamon and vanilla. Do try this one out.

Ingredients

6 slices of wheat bread, diced
2 eggs
1 cup milk
1/4 cup whipped cream
1/2 cup sugar
1 tsp vanilla extract
1 tsp cinnamon
a dash of nutmeg
1/4 cup chopped walnuts

For caramel sauce"
3tblsp sugar
3 tbsp water

Butter 1 tsp

Method:
Whip eggs together. Add milk, sugar, cinnamon, nutmeg and vanilla extract. Mix together. Stir in whipped cream. Add bread to the mixture and keep aside for 10 minutes. Meanwhile add 3 tbslp sugar to a pot and let it caramelize and turn brown. Then add equal quantity of water and stirring continuously mix the caramel together and let the volume reduce till the mixture turns thicker but not too thick and sticky. Pour it into the bottom of the baking dish. Add walnuts to bread mixture. Pour the bread mixture over the caramel. Dot with butter. Bake at 400 degrees uncovered for 30 minutes. Let it cool for 10 minutes and serve warm.

Thursday, April 2, 2009

Mamma's Chicken Masala


Its April finally! I'm due in two weeks people and i hope this baby sticks to schedule and doesn't make me wait. Well with baby on the way I have my mom here with me. She made this really yummy chicken curry which tasted just like they make in the restaurants. It tastes great with rotis or nans. Its a bit tedious to put together but hey it can be made on a day when you have a bit more time. Try it out, its really good. I find it tastes better the day after its been made which allows all the sauce to nicely soak into the chicken.

Ingredients

1 pound chicken pieces, preferably bone in

Marinade
1/2 cup yogurt
ginger paste 1 tsp
garlic paste 1 tsp
corriander powder 1 tblsp
Cumin powder 1 tsp
chilly powder 1 tsp
turmeric 1 tsp
salt to taste

For the sauce
3-4 cloves
1 inch cinnamon
black pepper -5-6 seeds
1/2 cup grated coconut
1/2 tsp saunf/fennel seeds
1 tblsp khuskhus/poppy seeds
1 green chilly

Other ingredients

One large onion
3 tblsp tomato paste

Method
Mix all ingredients of the marinade together. Add to chicken and let it marinate for at least 30 minutes. Meanwhile dry roast spices and poppy seeds. Then add coconut and roast for about a couple of minutes. Grind together all ingredients of the sauce using as little water as needed to make a smooth paste. Heat oil in a pot. Add one large chopped onion and fry till golden brown. Add tomato paste and fry. Cook till oil floats to the top. Add chicken without the marinade and fry till chicken brown a bit. Add the marinade slowly in batches cooking for a minute or two between each addition. When the chicken is half cooked, add the coconut gravy paste with 1/2 cup water and cook till chicken is completely cooked. Garnish with chopped cilantro and serve with nans.

Wednesday, March 11, 2009

Plum Compote


Like many new expectant parents Nits and I finally succumbed and got our costco membership:hey have to save on those diapers! So as is all too common while shopping at these wholesale stores, I ended up with way more stuff than I needed. We bought this giant box of plums and it was taking forever for us to finish them off before they went bad. Finally I took the last half a dozen or so of the plums and made a nice compote out of it. I added rose water to the compote, a unique idea from 101 cookbooks, one of my favorite food blogs. This compote goes so well with toast, sweet and tangy and the rose essence makes it even better.

Ingredients

Plums 6, washed, and cut into pieces
lime juice 2 tblsp
Rose water 2 tblsp
Sugar: same quantity as plums (I had 1 cup diced plums and I used 1 cup sugar)

Method
Dice plums. Place in a bowl. Add sugar, lime juice and rose water. Let it sit for 30 minutes.

Add the plum mixture to a deep bottomed pot. Boil on low heat. Remove any froth as it forms. Once it stops foaming, remove from heat, add to jar and cool.

Saturday, March 7, 2009

Almond Biscotti


Finally a post after all these days. Now that I'm in the middle of my third trimester I have slowed down so much. I get so tired after work, all I want to do is put my feet up and lie on the couch. This has resulted in procrastination on making stuff and posting it. Well, last week our friend Danielle threw me a really beautiful baby shower. All our friends from work came and we had so much fun. I got beautiful gifts and i'm so grateful for all the love people showered on us and our lil one. Anyway, I wanted to thank Danielle and her girls for the beautiful shower. I saw this really cute cookie jar in target the other day:colorful and bright, something the girls would love. So decided to fill it with something homemade. Since Danielle is not a big fan of simple sugars, I decided to make a healthy cookie and whats better than the traditional biscotti. Using no fat, low sugar and lots of toasted almonds this indeed is a very healthy yet delectable treat. Biscotti is a twice baked cookie that is great for dunking in coffee. So here is my recipe:

Ingredients (makes 2 dozen)

2 cups all purpose flour
1 cup almonds, toasted and chopped
1 tsp almond extract (for a more intense flavor add 1.5 tsp)
1 tsp vanilla essence
3/4 cup sugar (maybe 1 cup if you like it a little sweeter)
3 eggs
dash of salt
1 tsp baking powder

Method:
Preheat over to 300 degrees. Combine dry ingredients. Beat eggs with almond extract and vanilla essence. Add slowly to dry ingredients mixing with an electric mixer. Add almonds and continue mixing until a dough forms. Flour your hands and surface and form the dough into logs. This recipe will make two logs about 10 inches long. Line a baking sheet with parchment paper. Place logs on the sheet and bake for about 40 minutes. Remove and let it cool for 10 minutes on a cooling rack.

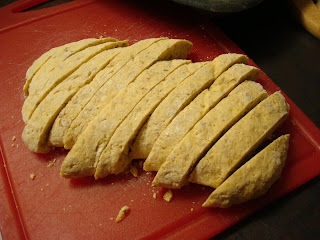
Transfer to a cutting board and use a serrated knife to slice the biscotti diagonally.

Place each piece on the baking sheet and bake again for 10 minutes on each side. Remove from oven and let it cool. A nice touch is to dip each end of the biscotti in melted choolate and letting that cool to get chocolate dipped biscottis.